

How to the Install Windows and Bootable Windows iOS Using Rufus
1. Create a Bootable Windows Drive Using Rufus
- Step 1: 1. Go to the Rufus website. Scroll down to the Download section. Click on the latest version to download it. Once downloaded, double-click the file to install Rufus on your computer.

- Step 2: Now, plug in a USB drive. Ensure that it has at least 8GB of space. Remove and back up any important files from the USB drive.

- Step 3: Open Rufus and select your USB drive. Click Select and choose the Windows 11 ISO file you have downloaded.

- Step 4: Choose GPT as the partition scheme and UEFI as the target system. Name the volume label (e.g., “Windows 11”).

- Step 5: Leave the file system as NTFS and click Start.

- Step 6: Confirm the installation and wait for the process to complete.
2. Install Windows 11 on Your Device
After creating a bootable USB drive, you can plug the drive into any PC and boot Windows onto the device. Different systems use different boot access menus. Here are the most common brands and how to access the boot access menu on them.
- Step 1: Plug the USB drive into the PC, turn on your laptop, and press the boot menu key multiple times as soon as before the logo appears. If the system reboots, shut down the system again and try again.
- Step 2: You will see a Windows start menu screen upon booting. Choose the boot menu from the options. It might vary on your device. For HP laptops, you can press f9 to select the boot menu.

- Step 3: Now, use the arrow keys, select the USB device, and press Enter. It reboots your system.

- Step 4: Select the Windows language and click on the Next.

- Step 5: Click on the Install now

- Step 6: Your windows will restart.

- Step 7: Accept the terms and conditions and click on Next.
- Step 8: Select the type of installation you want. Choose Upgrade to update existing windows without losing all your data. If you want to do a fresh installation, select Customised. In this case, I am going for Customised. Ensure to back up your files before starting this process.

- Step 9: Now, you want to partition the disk. Select the primary drive and click on the next.

- Step 10: Now, you will see a Windows installation Wizard. Wait until your device reboots. That’s it—you have successfully installed Windows 11 on your device. Follow the steps below if you want help setting up Windows 11.
3. Setting Up the Windows 11
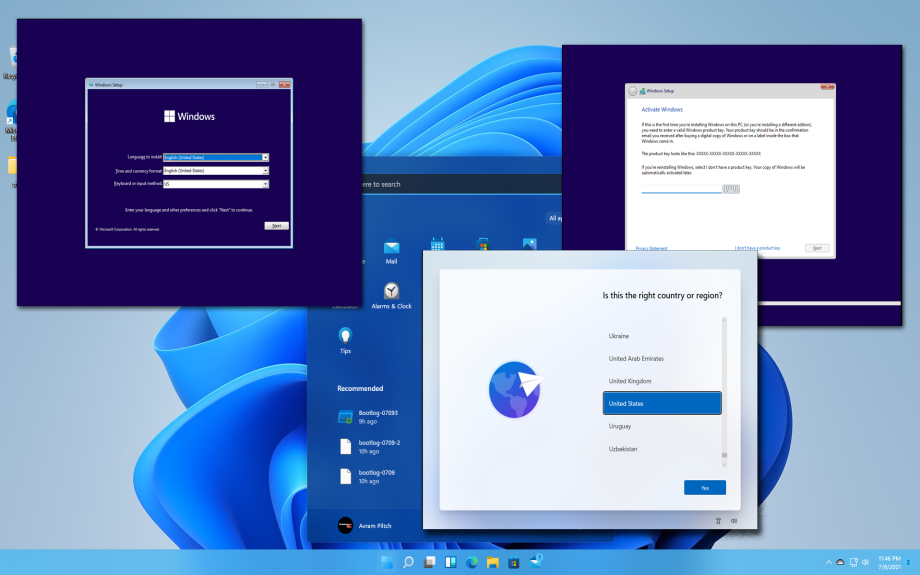
After successfully installing Windows 11 on your device, you must go through the initial Windows 11 setup to complete the installation. Wait until your system reboots and you see a Windows logo.
![]()
- Step 1: First, select the county and click Yes.

- Step 2: Now, choose the keyboard input method, select the keyboard layout or skill, and click Yes.

- Step 3: Next, connect your device to the internet. Enter the network you want to connect to, enter the password, and click Next.

- Step 4: It will now check for Windows updates. After that, click on Next.
- Step 5: Enter your Microsoft account information or click Skip to sign in without a Microsoft account.

- Step 6: Enter the account password.

- Step 7: Choose whether to restore Windows from a backup or set up as a new device, and click Next.

- Step 8: Now, set up a security PIN for your Windows account. Re-enter the PIN and click Enter.

- Step 9: Click on accept to accept the Privacy and policy settings. You can disable the options if you want.
- Step 10: Now follow the on-screen instructions. You can skip the customized experience, Use your phone from your PC, Backup your phone photos, Free trial of Microsoft 365, PC Game Pass, and more.

- Step 11: Windows will start applying updates, if any. Wait for the update to finish, and your system will automatically restart. Windows 11 will then be installed on your device.

In addition, you can burn the ISO to a DVD (for older devices) or use the official Windows Media Creation Tool to install Windows 11 on your PC. If your PC doesn’t meet the minimum requirements to install Windows 11, you can use Rufus, an open-source tool, to create a bootable USB drive for Windows to bypass the system requirements. With this tool, you can bypass TPM, RAM limits, and the online account requirement to install Windows 11 on your device.
Conclusion
Follow those steps to install Windows 11 ISO files without any complex process. Thanks to recent changes, Microsoft offers official public links to download Windows 11 files. Additionally, with some adjustments, you can even install Windows 11 on a device that doesn’t meet the requirements. You can activate Windows later from the settings. If your previous Windows 11 installation is activated, the new installation should also automatically activate.
If you want to update Windows or completely wipe your data and install a fresh version of Windows, it is recommended that you back up your data first. You might likely encounter ‘This PC can’t run Windows 11’. To fix this, ensure you select options to remove limits when creating a bootable USB using Rufus. Another common error is that a media driver is missing. You can easily fix this using a USB port or downloading the latest error. Another common error is Partition issues, to fix this ensure your PC has enough storage.
Share Now
| Total Download | (0) |
|---|


